
INSTALLATION TIPS FOR SECURITY CAMERA SYSTEMS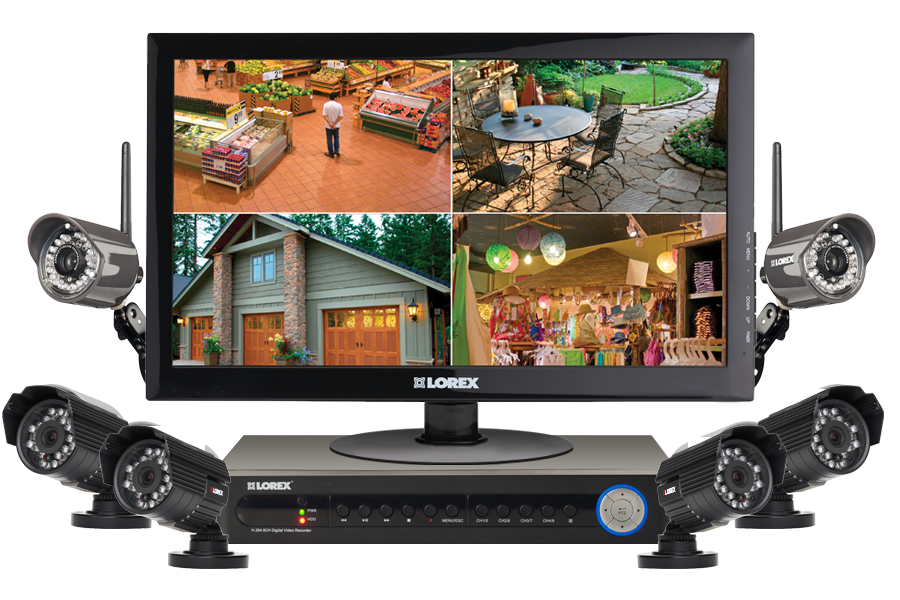
THE INSTALLATION OF SECURITY CAMERA SYSTEMS
Section A: Over View
The first step is to design your Camera System to a design similar to the below schematic diagram. While in the schematic below the Cameras are connected to a Video Server, the Cameras could be connected to a Digital Video Recorder (hereafter called DVR), Network Video Recorder (hereafter called NVR) OR a Hybrid Video Recorder.
In older systems the Cameras would have been connected to a Computer with a Capture Card and a Hard Drive OR a Time Lapse Recorder with one Tape for each day or each week.
Today, apart from in some very large systems DVRs and NVRs have become the industry standard because of their reliability.
Older Camera Systems would have used Coax or Composite Cable to connect the Cameras to the DVR, NVR, Video Capture Card or Time Lapse Recorder, newer Camera systems usually use Cat5e or Cat6 Cable and Baluns or the Cameras may be connected by a Wireless Connection.

Most Cameras are powered by 12VDC, however some Cameras use 24VDC or 24VAC, or even other Power Voltages OR Amperages, ALWAYS meter OR read the specifications of the cameras power supply requirements, using incorrect Power Supplies will likely damage the Cameras or the DVR, NVR or both, damage caused by using incorrect voltages will negate any warranty.
Most Cameras Systems are connected to a Monitor, Standard TV or HDMI TV; more modern systems can be networked to Local or Remote computers or to cell phones through connecting the DVR, NVR or Video Server to the Internet.
Occasionally some clients want their Camera System monitored by a Central Monitoring Station; this service is available but is an expensive and unreliable option, and puts a lot of responsibility on the Monitoring Station as sometimes it is hard to see intruders who don’t want to be seen.
The Option most clients want is to be notified when their alarm activates and then they view their Camera system through their Cell Phones
The DVR, NVR or Video Server stores the pictures onto a Hard Drive or multiple Hard Drives, the size and number of hard drives that any system can have depends on the type of System, 2, 3, 4 and 6 Terabyte (TB) hard drives are commonly used.
Most clients want 3 to 4 weeks storage time, the amount of storage depends on:
- The number of Cameras
- The Number of Frames Stored per second, (varies from 1 to 21, usually 8)
- The size (quality) of the picture stored
- How often the Camera Picture Changes (how busy the location of the Camera is)
- If you set the DVR, NVR or Video Server to record on movement only, (Recommended)
Types of DVRs and Security Cameras
The type of the DVR and the Type of Security Cameras to be installed is the most important consideration when designing a system, this will affect the:
- The number of Cameras required.
- The Number of Frames Stored per second, (varies from 1 to 21, usually 8)
- The maximum cable run distance
- The cable type used
DVRs / NVRs are:
- Analogue
- High Definition (HD) Analogue
- IP
- Hybrid (A combination of both IP and Analogue)
We recommend High Definition Analogue or Hybrid Systems; this technology offers a compelling alternative to traditional Analogue and IP surveillance options,
HD Analogue video security solutions:
ü Deliver megapixel resolution over Coaxial, Cat5e and Cat6 cabling
ü Are far less complex to install and operate than IP Systems
ü Require less Maintenance than IP
ü Allow the client to connect their existing Traditional Analogue Cameras
ü Require less Cabling
HD Analogue Cameras use the following Formats
- CVI
- AHD
- TVI
4 in 1 Cameras use all of the above PLUS CVBS (Traditional Analogue)
5 in 1 Cameras can use all of the above plus have some IP Ports
When choosing HD Analogue Cameras the Format is important
The Video Output (what you see on the Monitor OR TV screen) varies between the formats
CVI Cameras are very good in daylight but not so good in low light
AHD Cameras have a less crisp image and the colour is not as true
TVI Cameras are very good with true colours
CVBS Cameras are traditional Analogue with low resolution
SDI Cameras are an older HD format that are not commonly used today
The Maximum Transmission distance Varies between the cable used and the formats (table in Meters)
CVI Cameras using: Coax 400 Cat5e OR Cat6 200
AHD Cameras using: Coax 500 Cat5e OR Cat6 150
CVBS Cameras using: Coax 150 Cat5e OR Cat6 120
TVI Cameras using: Coax 500 Cat5e OR Cat6 220
The Formats used vary between different manufacturers
CVI Format is commonly used by Dahua
AHD Format is used by many manufacturers
SDI Format is limited as many manufacturers move to TVI
TVI Format is used widely
We recommend using 4 in 1 Cameras
IR Cameras: Array IR OR Standard IR. Array IR has the following advantages:
ü Longer Life IR (up to 9x)
ü Higher Efficiency
ü Higher Brightness
ü More Even Light
ü Smaller in size
We recommend Array IR Cameras
What Resolution quality do you require?
ü 1.3 MP (960P)
ü 2 MP (1080P)
ü 3 MP (1280P)
ü 4 MP
ü 5 MP
ü 8 MP
Section B: The Goal when Installing a Camera System
“To provide the Best Quality Pictures using the equipment installed”,
You do this by:
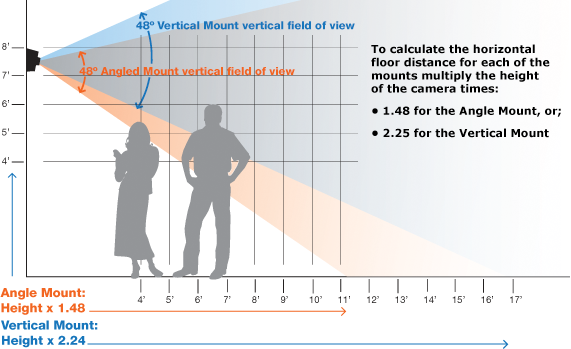
ü Siting the Cameras in the best position possible
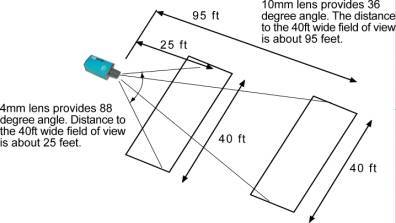
ü Using the Correct lens
ü Using the best installation techniques
Where to Site Cameras:
- In locations most likely to give good facial and body shots which can be used in Court
- Over Cash Registers
- In areas to view Safes and money counting areas
- In entry and exit areas
- In areas to view small, valuable products such as Jewelry and Make Up
- In vehicle entry areas to read Number Plates or at least get a good picture of the Vehicle
- In locations so the Public are aware they are under Surveillance
Section C: Building the System
Firstly decide where the Cameras are to be located and where the DVR, NVR or Video Server is to be sited.We recommend that you always install a Monitor, Standard TV or HDMI TV at OR near to (within 2-3 meters) the location of DVR, NVR or Video Server, this makes it easy for viewing purposes, programming, playing back and taking off pictures.
You may require Conduit or Capping;
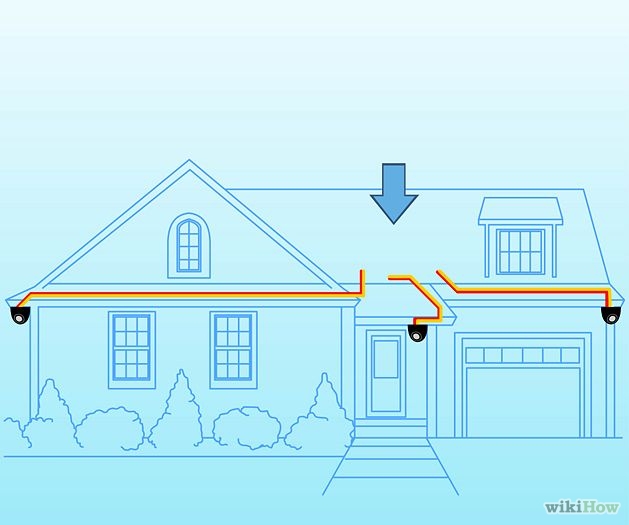
Homes are usually more difficult than Business Premises and Offices, for multiple level homes siting of the Cameras is more difficult, the cable to the Cameras will usually be a combination of being located in any available roof cavity, or in cupboards or under the Floor or in Conduit around eaves.
Offices are usually easier as most have push up tiles, or cables already fixed to walls, and with the use of capping when running cables down walls the result is a tidy finish
Time spent planning is time well spent and can make difficult jobs easy.
Section D: Cabling For Hybrid and High Definition Analogue Systems
There are 4 types of commonly used Cables to Connect Security Cameras to the Recorder
- Cat5e
- Cat6
- Coax Cable (You need to run a separate Camera Power Supply Cable
- Composite Cable (a Coax Cable and Power Supply Cable is in 1 cable)
Cabling Options
1) Connecting Cameras to the DVR, Video Server using Cat5e or Cat6 Cable
If the Cameras are in the same building as the DVR or Video Server, OR are in a Remote Building that is close or has Overhead cables going to it:
For Analogue HD Systems we recommend that you run Cat5e or Cat6 Cable to the Cameras;
ü It is easy to use, we connect all Cameras to Passive and Active Baluns and DCM and DCF Plugs
ü It is cost effective
ü It is Readily Available
ü It will successfully operate 2 Cameras over 1 Cat5e cable provided the Cameras are no more than 50 Meters from the DVR or Video Server
ü It will successfully operate 2 Cameras over 1 Cat6 cable provided the Cameras are no more than 300 Meters from the DVR or Video Server
ü For connections up to 80 Meters away use Passive Baluns
ü For connections from 80 to 300 Meters away use Active Baluns
ü It fits easily into Conduit and Capping
Note: While it is possible to run Cameras over much greater distances using Cat6 for distances over 300 meters it may be cheaper and easier to use Wireless Links instead of running Cat5e
If the Cameras are not in the same building as the DVR or Video Server, we recommend that you install a Hybrid Video Recorder or NVR and use a Wireless Bridge to the Building, a Wireless Bridge, see E below
Connecting Baluns to Cat5e or Cat6 Cable, we recommend that you use the following colour coding
ü Orange to +12VDC for camera 1
ü Orange/White to – 12VDC for Camera 1
ü Blue to + on Balun for Camera 1
ü Blue/White to – on Balun for Camera 1
ü Brown to +12VDC for camera 2
ü Brown/White to – 12VDC for Camera 2
ü Green to + on Balun for Camera 2
ü Green/White to – on Balun for Camera 2
Connecting Baluns;
Bare back 8mm of Cable, bend half the bared back part over itself and connect to the Balun using the coding above, one Balun is connected at the Camera end and one at the DVR, NVR or Video Server
Connecting DC Plugs;
DC Plugs carry the 12VDC for the Cameras from the Power Supply (usually located at the DVR, NVR or Video Server to the Camera. Bare back 8mm of Cable, bend half the bared back part over itself and connect to the DC Plug using the coding above. At the Camera End use the DCM (Male) Plug and at the DVR end use the DCF (female) plug
2) Connecting Cameras to the DVR or Video Server using Coax;
Bare back the Cable, and fit the connector as above and below using a stripping and clamping tool as below
3) Connecting Cameras to the DVR, NVR or Video Server using Composite Cable;
Bare back the Cable, and fit the Coax Connector and DC Plug as above using the stripping and clamping tool
DO NOT:
- Run Cables alongside High Voltage Power Cables Or you may get interference, reflected by the Picture moving and shimmering
- If Installing Cameras onto metal and there is picture shimmering isolate them from the Metal by fixing a wooden Block, Plastic Block or a similar Non Conductor to the metal and fix the camera to the wood, or Plastic, if it continues then try using Ground Loop Isolators, or Active Baluns or move the Power supply to the Camera end, especially if you have along cable run
- Run 2 cameras over one Cat5e cable if the cable run is more than 80 meters OR you may get interference.
- Joint cables Underground as you will never seal the waterproof box the joint is in.
- Leave Baluns and DC Plugs out in the Weather, If outside push them up into the Surfeit OR into the Wall and cover the hole with the Camera Base or put them in a waterproof Box but cut breathing holes underneath it to let condensation out
YOU CAN:
- Power the Camera from a Remote Power Source, if the Camera is more than 80 meters away we recommend that you do this and over this distance recommend that use spare cables in the Cat5e to double up on Cables
Section E: Cabling For NVR and Cameras using a Hybrid IP Port
There are 2 types of commonly used Cables to Connect Security Cameras to the NVR or Hybrid IP Port:
- Cat5e
- Cat6
Connector / Fittings Used: RJ45
Cabling Options
1) Connecting Cameras to the Video Recorder using Cat5e or Cat6 Cable
If the Cameras are in the same building as the Video Recorder, or are in a Remote Building that is close or has Overhead cables going to it:
For each Camera run one Cat5e or Cat6 Cable;
ü It is cost effective
ü For connections from 80 to 300 Meters away use a Remote Power Over Ethernet (POE) Switch
ü It fits easily into Conduit and Capping
Note: For distances over 300 meters it may be cheaper and easier to use Wireless Links instead of running Cat6 cable
If the Cameras are not in the same building as the DVR or Video Server, we recommend that you use a Wireless Bridge to the Building,
A Wireless Bridge:
ü Is cheaper than digging trenches
ü Will successfully operate multiple Cameras over one Bridge
ü Will successfully operate Cameras up to 2KMs away provided you have line of sight
Multiple Cameras can connect to a Wireless Bridge:
DO NOT:
- Run Cables alongside High Voltage Power Cables Or you may get interference, reflected by the Picture moving and shimmering
- If Installing Cameras onto metal and there is picture shimmering isolate them from the Metal by fixing a wooden Block, Plastic Block or a similar Non Conductor to the metal and fix the camera to the wood, or Plastic, if it continues then try using Ground Loop Isolators, or Active Baluns or move the Power supply to the Camera end, especially if you have along cable run
- Joint cables Underground as you will never seal the waterproof box the joint is in.
- Leave Joints outside push them up into the Surfeit OR into the Wall and cover the hole with the Camera Base or put them in a waterproof Box but cut breathing holes underneath it to let condensation out
YOU CAN:
- If the Camera is more than 80 meters away we recommend that you use a Local POE Switch which will save on cabling
Section F: Installing the DVR, NVR or Video Server
a) DVR
b) NVR
If the NVR does not have an onboard Power Over Internet Switch (POE) then the NVR will require the addition of one, the POE switch plugs into the NVR using an data cable
c) Video Server
1) Siting of the DVR, NVR or Video Server
Unpack theDVR, NVR or Video Server and set it up in a secure location with good ventilation.
Install it:
- Where it is not too hot or dusty
- Where it will not be bumped or suffer undue vibration
- Where it is easily accessible
- Close to a power source
- Ideally on a shelf
2) Connect the DVR, NVR or Video Server to a Plug Bank
3) Connecting Cameras to the DVR, NVR OR Video Server using Cat5e or Cat6 Cable
a) DVR and Video Server
Bare back the Blue and Blue / White Cables to the Camera, (make sure the Polarity is correct) and connect to a Balun then Plug the Balun into the Video Channel, starting at Channel 1, continue for all Cameras, then tie OR tape the cables together
b) NVR
IP Cameras are connected using RJ45 Plugs; No Baluns are used
4) Connecting the Camera’s Power Supply to a Female DC Plug using Cat5e
Bare back the Orange and Orange / White Cables to the Camera, (make sure the Polarity is correct) and
Connect to a Female DC Plug; depending on the distance to the Cameras you can connect up to 4 Cameras to 1 DC Plug
5) Connecting the Female DC Plug a Power Supply and Plug the Power Supply into the Plug Bank
Tape the Join so it is secure
If you are installing a large System you may install a Larger Power type of Power Supply which is in a cabinet and mounts on a wall
6) Connect the Monitor, Standard TV or HDMI TV to the DVR, NVR or Video Server
Locate the Monitor in a secure location and Plug into the DVR, NVR or Video Server
If you want it installed on a wall then you will need a wall bracket to mount it on, beware of the cost
7) Connecting a second or third Monitor, Standard TV or HDMI TV to the DVR, NVR or Video Server.
Different makes of DVR, NVR or Video Server have different outputs available; most of the DVRs /NVRs we sell have:
ü 1 VGA to a Monitor, (you can expand by adding a 4 Port VGA switch)
ü 1 HDMI to a HD TV (you can expand by adding a 4 Port VGA switch)
There are distance considerations:
ü VGA – Up to 40 meter VGA Cables are available
ü Over 40 meters use a VGA over Cat Extender, maximum distance 100 meters
ü Coax – Gives Poor quality Pictures (400 TV line quality only)
ü HDMI – Up to 20 meters use a HD extender
ü HDMI Extenders come in 2 sizes, up to 50 Meters and over 50 meters
8) Connecting the DVR, NVR OR Video Server to the Internet Router.
Run a Patch Lead Cable from the DVR, NVR or Video Server to the Internet router. Unless you are confident in fitting RJ45 Connectors to Cat5e cable and have the Crimp tool and a test equipment use made to measure cables with ends already on, often even though your test equipment reads that the ends are on correctly our experience says they don’t always work, especially if you are not experienced in making them.
9) Connect the Mouse to the DVR, NVR OR Video Server
Section G: Installing the Hard Drive
All new DVRs, NVRs OR Video Servers will require a Hard Drive / Drives, if we supply them we will install and format them, if you supply them you will have to install and Format them. If you have to replace / add extra Hard Drives down power the DVR, NVR or Video Server before removing / adding and Hard Drives, once installed and repowered you will have to Format them, this will take a few minutes.
Once formatted the DVR, NVR OR Video Server should automatically come on Line.
Section H: Powering up the System
Once everything is connected it is time to Power up the System. The DVR, NVR OR Video Server will come preprogramed and come online after a few Minutes,
Check all cameras are:
ü Working
ü Providing the Picture Required
ü Focused
ü Recording on Movement Only (you will see a dot or similar come on the screen when the Camera is recording)
If one or more Cameras are not on the monitor then
ü Check there is power to them (usually12VDC) – Meter power at the DC Plug at the Camera end
ü Check the Balun connection
ü Check the Monitor, TV or HD TV is on
Section I: Programming the DVR, NVR OR Video Server
The DVR, NVR OR Video Server will come fully preprogramed and will require an access code to enter programming, to get to programming Right click the mouse and it will ask for a Password,
Usually it will be:
ü User name: admin
ü Password: admin
ü Change it to admin + the last 4 digits of your cell phone no
DO NOT LOSE YOUR PASSWORD or you will have to get the Password Reset which can be impossible OR at the least is costly
Once in programming you will have a Menu come up which will include such as:
- System
- Recording
- Connectivity
- Playback
- Maintenance
Scroll through and get familiar with the settings
Section J: Programming the DVR, NVR OR Video Server for Remote Access
Once the DVR, NVR OR Video Server is working then you are ready to set up the remote access to your cell phone, see our section “How to set up Remote Viewing” in our Help & Advice Section
Section K: Finishing Off
Before finishing:
- Push All Baluns and DC plugs at the Camera end up into the Surfeit or Similar so they are out of the weather and out of site, and covered with the camera, if this is not possible then put them in a Junction Box.
- Walk through the site making sure everything is complete,
- Draw a plan of all Cable runs and mark all Camera locations on a diagram for future reference.
- Make sure the system is kept powered up.
- Tape all cables so they are tidy behind the DVR / NVR